Looking for help?
Find answers to your questions
Frequently Asked Questions (FAQ)
Table of Contents
- VR is already connected to Prismpluse, but it cannot find the computer or start streaming.
- Oculus air link connects then disconnects
- 2.4G WiFi password input is incorrectHow to use PCVR with Puppis S1?
- Experiencing latency, stuttering, disconnections, etc.
- The download speed of the computer has become slower.
- Cannot detect the latest firmware, unable to upgrade firmware.
- Can I use a USB-C to USB-C data cable to connect the PC and Puppis S1?PrismXR App cannot detect Puppis S1
- How to connect the Puppis S1 to the internet?
- How to reset Puppis S1 to factory defaults?
- How to perform a software upgrade.
- Cannot enable PC Internet Sharing
- How to manually select the optimal channel.
- What to do if the password for 2.4G WiFi is entered incorrectly?
VR is already connected to Prismpluse, but it cannot find the computer or start streaming.
1. If VD and ALVR works fine but airlink fail to find PC,ensure all configure is OK but still not found PC. the root cause maybe "network discovery" has been disabled on PC. Follow below steps to open it:
- Win +R run services.msc
- Find and start three services and set to auto start: SSDP Discovery 、UPnP Device Host 、DNS Client
- Open PC 's Control Panel,found “Network Sharing Center” , then "Enable network discovery"
- Try airlink again
-
changing the network connection from public to private (on Windows 11, it's located on "Network & internet Ethernet Network profile type Private".)
-
Please note, some antivirus software might take over and control this property on the top of windows settings. If you are running antivirus software, please go to its settings and trust the newly added network.
-
Turn off Firewalls or antivirus Software
-
On window 10 Control Panel > System and Security > Window Defender Firewall then click on Advanced settings the click on Inbound Rules - scroll down OVRserver_x64.exe Private there should be 2 of them - on both select one at time then right click then select Properties and check Allow the connection then click ok for both
Please connect to the internet using PC Internet Sharing (Method: https://prismxr.net:8000/user/pc/guild/PC_Internet_Sharing_Guide.html) and update to the latest firmware (V1.19). After completing the firmware update, you can connect to 2.4G WiFi using the app or continue using PC Internet Sharing.Puppis S1 is an AX WiFi-based device that has been redeveloped specifically for improved streaming performance.
To assist you in setting up the Puppis S1, we recommend watching this video: https://www.youtube.com/watch?v=c9JpWRGuesE&list=PL8qdaG_2cXywUnOOJqXVQIdA2-nwu68dI&index=4
Once you have completed the setup, follow these steps for PCVR:
- Power on your PC and VR headset.
- In the Wi-Fi settings of your VR headset, select "PrismPulse" as the network.
- Depending on your VR headset, choose your preferred streaming method, such as Virtual Desktop (recommended), Quest Link, Pico Streaming Assistant, etc.
- Follow the instructions provided with the selected streaming method to complete the desired operation.
We will definitely assist you in resolving the issue to enhance your VR experience. This video should be helpful for you: https://www.youtube.com/watch?v=c9JpWRGuesE&list=PL8qdaG_2cXywUnOOJqXVQIdA2-nwu68dI&index=3Please attempt the following methods to resolve the issue:
- Ensure that your computer is connected properly.
2. Upgrade to the latest firmware.
Verify that the firmware is updated to the latest version
3. Reset Puppis S1
A.Take a paperclip or any other item with a diameter of approximately 0.04 inch (1 millimeter).
B.Locate the reset button on the back of the Puppis S1 (labeled "Reset").
C. Press and hold the reset button using the paperclip or item for 10 seconds until all three indicator lights on the Puppis S1 start flashing red. Then release the reset button.
D.The three indicator lights will flash red five times simultaneously, indicating that the Puppis S1 has been successfully restored to factory settings.
Note: Please ensure that the Puppis S1 is in the powered-on state.
4. Reboot your computer and VR
5. If you are using Virtual Desktop, please try adjusting the Virtual Desktop settings. 6) Adjust Virtual Desktop Settings' for troubleshooting, which can be found at https://smartglasseshub.com/fix-virtual-desktop-lagging-issues/#google_vignette.
6. If you are using Airlink, please refer to the following link for troubleshooting.https://smartglasseshub.com/oculus-air-link-not-working/
7. Disable Firewall / Antivirus (Temporarily)
8. Disable Nvidia GeForce Experience In-game Overlay
If you are using an Nvidia graphics card with Geforce Experience installed, go ahead and disable the in-game overlay option. The has caused numerous unexpected lagging, black screen, and also disconnect issues when used with Oculus Link.To disable the feature, open Geforce Experience, click on the cogwheel “Settings” option and toggle the “In-game overlay” option to disabled.
your computer may have two network cards capable of connecting to the internet. Since Windows automatically adjusts the priority order of the two network cards, when you plug in the Puppis S1, the computer will connect to the internet through the 2.4G WiFi of the Puppis S1, which can result in slower download speeds. There are two solutions:
Solution 1: Set network priority on the computer. Prioritize the network the computer is connected to. For detailed steps, please refer to https://windowsreport.com/wifi-priority-windows-11/.
Solution 2: Use PC Internet Sharing with the Puppis S1. In this case, the computer will use its own network connection. For instructions on PC Internet Sharing, please refer to https://prismxr.net:8000/user/pc/guild/PC_Internet_Sharing_Guide.html.
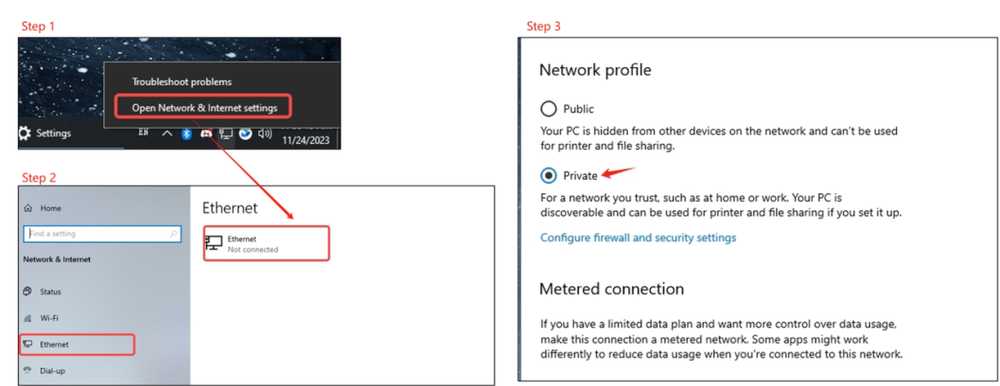
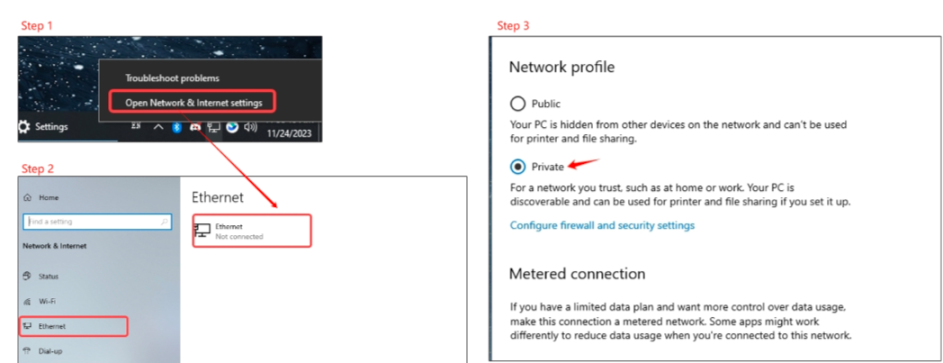
Make sure that your Puppis S1 is connected to the network (you can check if it can access the internet in VR).One possible reason for the lack of network on the Puppis S1 could be the firewall settings on your computer. Could you please check if your computer's firewall is restricting any access for the Puppis S1? Additionally, you can try changing your computer's Ethernet settings to private.
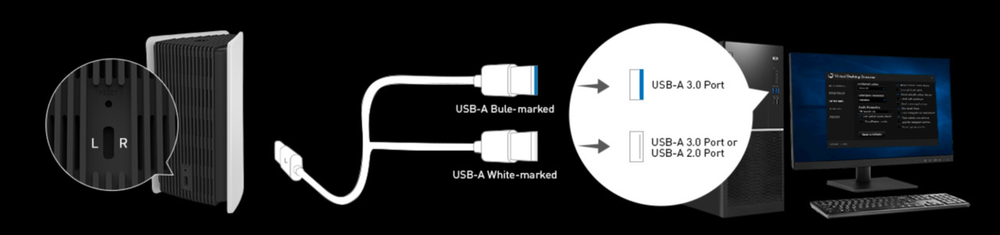
Considering that many PCs do not have USB-C ports, we also provide a dual USB-A to USB-C data cable. You can choose to use a USB-C to USB-C 3.0 data cable, which is not provided, to connect your PC and Puppis S1.Note: If you find that Puppis S1 cannot be turned on while using the USB-C to USB-C data cable, please unplug the Type-C connector from the Puppis end, rotate it 180 degrees, and plug it in again.
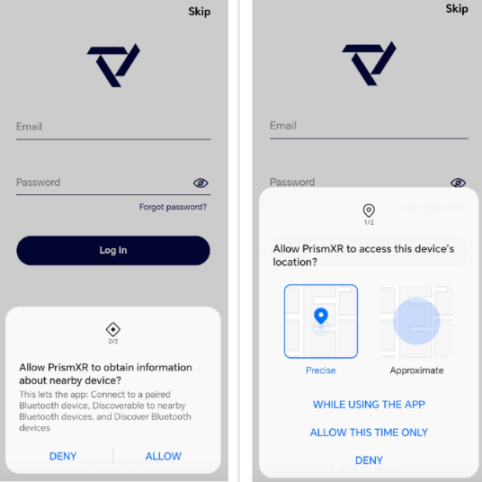
Please ensure that the App has been granted permission for "Location" and "Nearby Devices". If you are unsure, please uninstall the App and reinstall it.
- Please kill the PrismXR App in the background.
- Please press the set button once.
- The bottom LED light will flash white. (It will keep flashing for 3 minutes. While it is flashing, Puppis S1 is in pair mode and looking for a phone.)
- Please turn on the PrismXR App. Normally, the Puppis S1 will just pop up for you to add. If it doesn't pop up for about 10 seconds, click "+" at top right and select Puppis S1.
- If your App still can't find Puppis, please restart your phone and try step 4 again.
There are two ways to connect the Puppis S1 to the internet: 2.4GHz Wi-Fi and PC Internet Sharing. If your computer is connected via Ethernet, the network signal will be more stable.
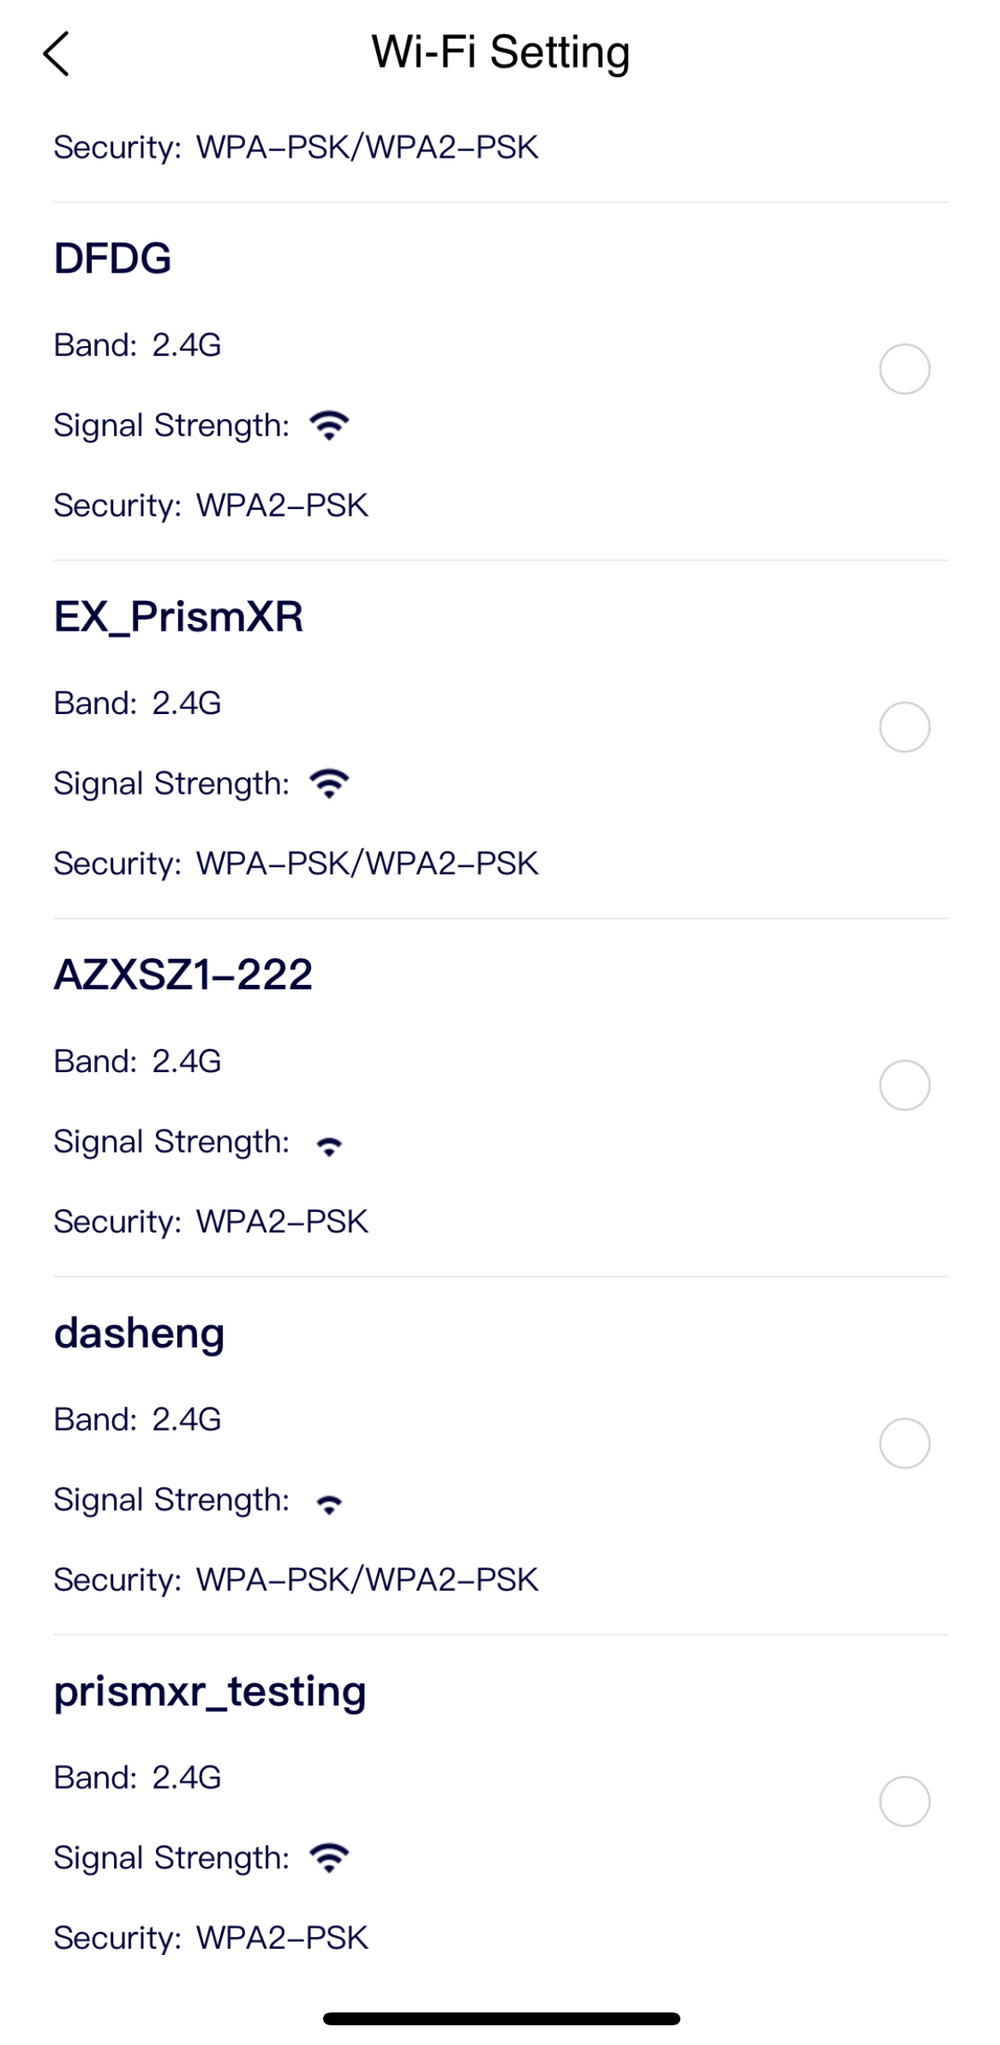
- Connect to 2.4G WiFi: Please click on "Internet" in the app, then click on "Wi-Fi Setting", and select the 2.4G WiFi you need to connect to.
- To enable or disable PC Internet Sharing, please refer to the following link: https://prismxr.net:8000/user/pc/guild/PC_Internet_Sharing_Guide.html
Note: When both PC Internet Sharing and 2.4G WiFi are connected, PC Internet Sharing takes precedence.If PC Internet Sharing has been set up but there is no network. the issue may be due to the following reasons:There is an issue with the built-in DHCP server in Windows, which is not assigning the correct address to the Puppis S1. This causes the PS Internet Sharing status of the Puppis S1 to become invalid and remain in PC Internet Sharing status.Solution:To reconfigure PC Internet Sharing, follow the steps below:Step 1: Disable PC Internet Sharing on the PC.Step 2: Re-enable PC Internet Sharing.You can try the above steps several times until the Wi-Fi can be connected successfully
To reset the Puppis S1 to factory settings, you can follow these steps:
- Take a paperclip or any other item with a diameter of approximately 0.04 inch (1 millimeter).
- Locate the reset button on the back of the Puppis S1 (labeled "Reset").
- Press and hold the reset button using the paperclip or item for 10 seconds until all three indicator lights on the Puppis S1 start flashing red. Then release the reset button.
- The three indicator lights will flash red five times simultaneously, indicating that the Puppis S1 has been successfully restored to factory settings.
Note: Please ensure that the Puppis S1 is in the powered-on state.
To ensure our customers have the best user experience, we highly recommend you update to the newest version firmware.
- If the App shows "Update Available", click "Update Firmware" to view the updated information.
- Click "Install" to download and install the new firmware.
- Keep the Puppis S1 connected to both the PC and the Internet, the Puppis S1 will restart after updating is completed.
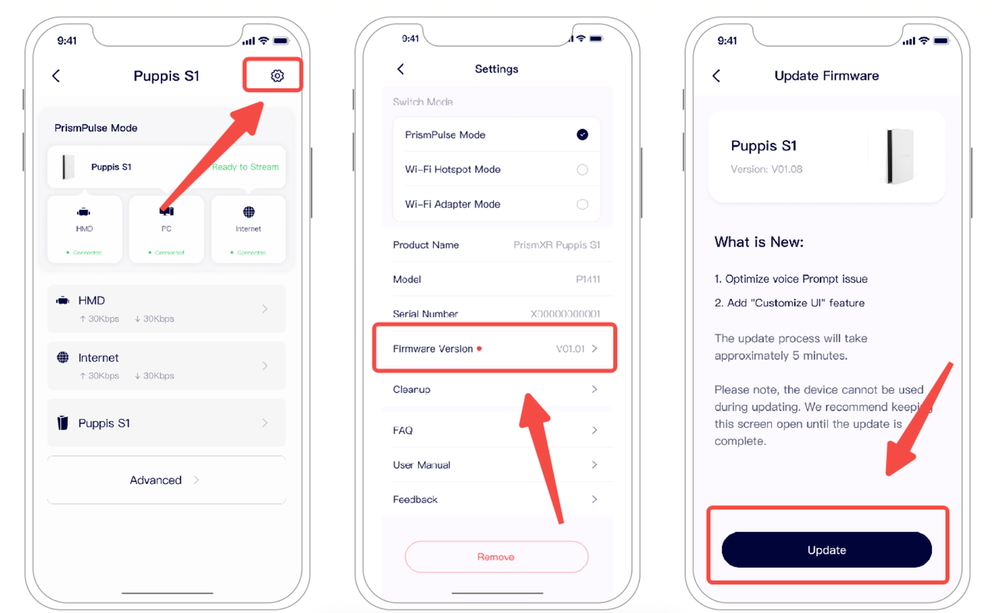
If you have not received a firmware upgrade notification, please follow the steps below.
- Connect to the internet.
- Click on the settings icon.
- Click on Firmware Version.
- Click Update.
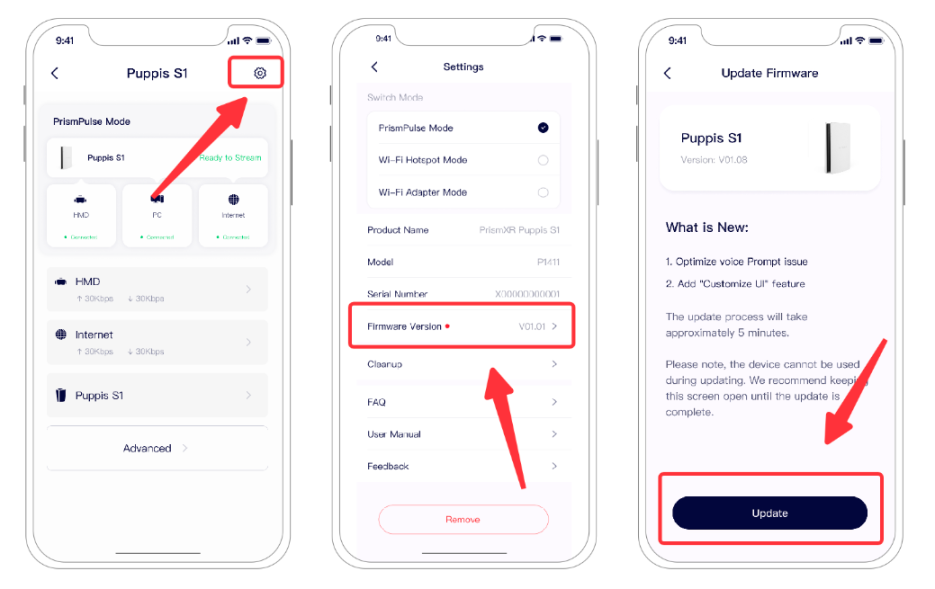
During the upgrade process, the product can still be used, and you do not need to stay on this page. The upgrade process takes approximately 10 minutes.
- During the update process, the device will disconnect from the App, and the App will be unable to monitor the progress of the device's update.
- Once the firmware update progress is complete (successful/failed), the device will automatically restart, reconnect to Bluetooth, Close the app and reopen it to see if the firmware update is completed. Please note that the latest firmware version is V1.16.
During the upgrade process, the product can still be used, and you do not need to stay on this page. The upgrade process takes approximately 10 minutes.
- Please check the network details after PC Internet Sharing is enabled on your PC by a. Click the windows, then type in the settings. Go to Settings > Network & internet. b. Double Click Puppis S1 and choose Details.
The correct and working properties should be as follows. Please provide us with a screencut if you see something different.

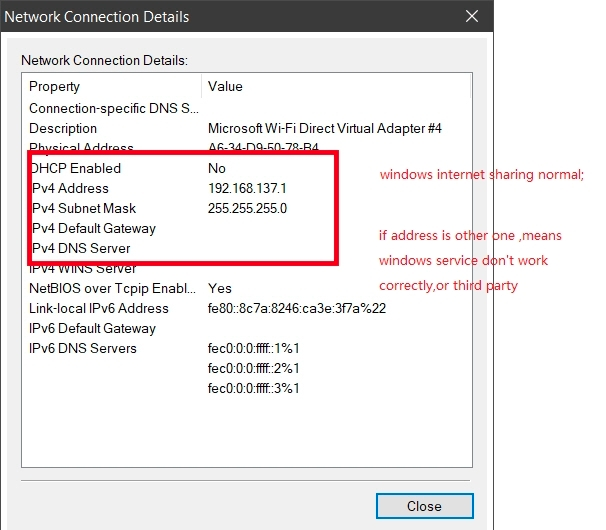
2. Please download the https://drive.google.com/file/d/1KaGs_dudKvQ4cg6bYHU74y1kwe-pVIrU/view?usp=sharing and as administrator. This will enable the ICS (Internet Connection Sharing) Service and might help.
3. If the above two steps do not resolve your issue, please manually edit the "IPv4 Address" and "IPv4 Subnet Mask" by following these steps: a. Right-click on 'Puppis S1' and select 'Properties' on the 'Network Connections' interface. b. Click on 'Internet Protocol Version 4 (TCP/IPv4)' on the 'Properties'. c. Manually edit these two fields to: IPv4 Address: 192.168.137.1 and IPv4 Subnet Mask: 255.255.255.0
An error occurred while internet connection sharing was being enabled: internet connection sharing is currently enabled for connection 'wireless_32768'. Please try the following troubleshooting steps:
- Disable PC Internet sharing.
- To launch Device Manager, select the Start button, type Device Manager, and press Enter. Then follow these steps:
a. Expand the node Network adapter that represents the type of device that you want to uninstall, right-click the device entry for the device you want to uninstall, and select Uninstall.
b. On the Confirm Device Removal dialog box, make sure you unselect the Delete the driver software for this device option. When ready to complete the operation, select OK. - Unplug then replug Puppis S1 USB Port to PC.
Please update the app to the latest version (V1.1.20) from the app store and ensure that the Puppis S1 firmware is updated to the latest version (≥V1.19).
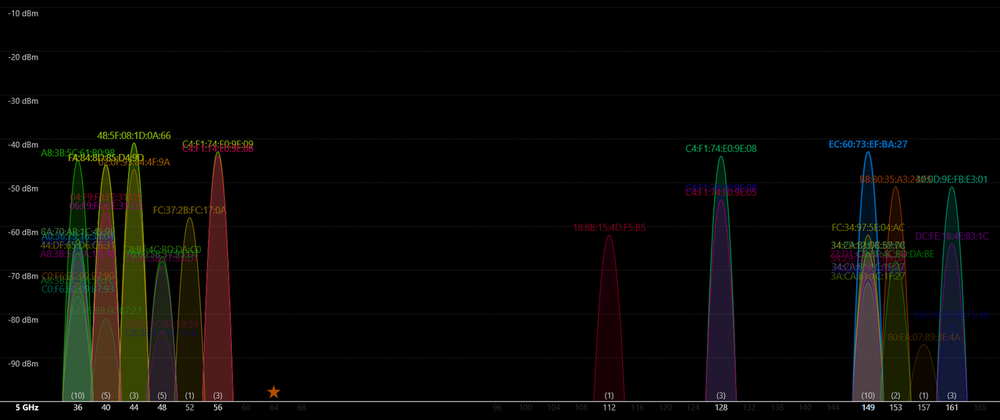
- Method 1:Using the third party software tool
Step 1:Download the third party tool from Microsoft app store and intallFor example WiFi analyzer,https://apps.microsoft.com/detail/9NBLGGH33N0N?launch=true&mode=mini&hl=en-us&gl=CNStep 2: You can view the channels occupied by surrounding wifi networks,and choose a fixed channel manually
2. Method 2:Using Puppis S1 Adapter Mode
Step 1:Switch Puppis S1 to Wi-Fi Adapter Mode by Prismxr APPStep 2: Click to enter the Internet Setting
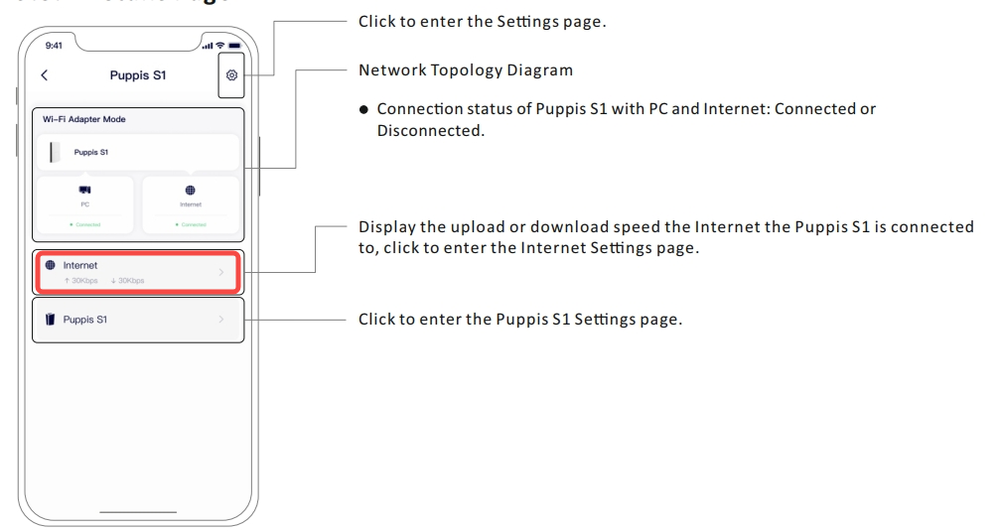
Step 3: Click Wi-Fi Setting, it will search for wifi networks around,then it displays available the Wi-Fi network lists.From the lists, you can find what channels are used by Wi-Fi.